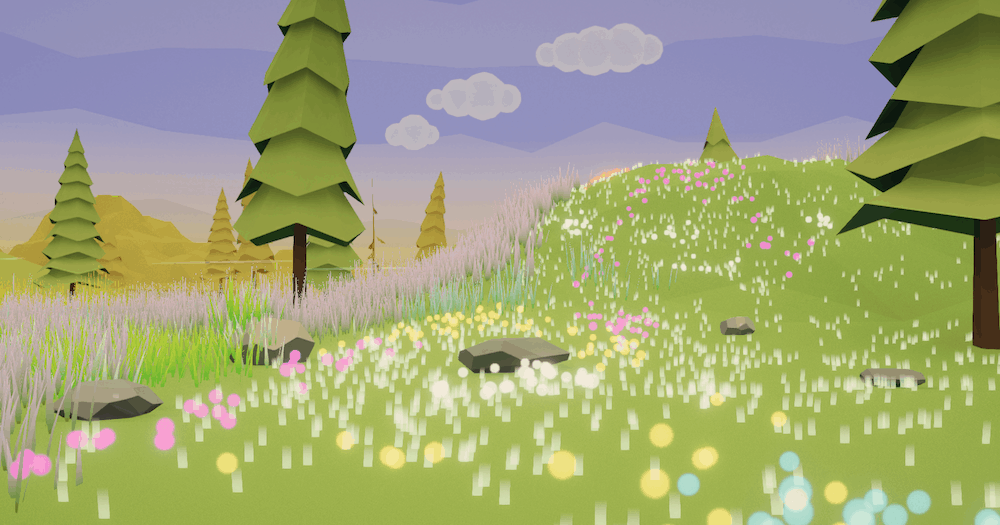
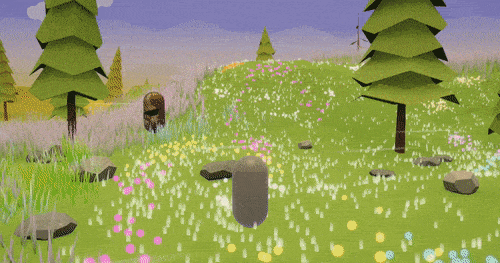
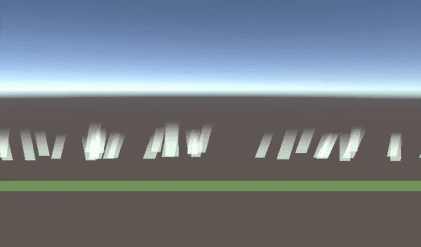
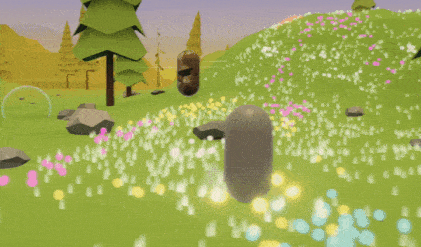
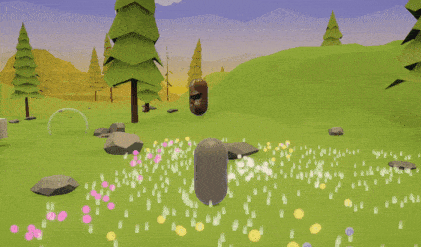
Sky: Children of the Light is one of my favorite games I am playing recently. During the pandemic, it is a great place where we are able to meet people (or even friends) from all over the world. Beyond the plot, music, and cosmetics, I enjoyed every second when I was sliding on those beautiful lands, especially the stylized grass on top of them. In this post, I will share my experience in reproducing the grass in Unity under Universal Render Pipeline (v7.5.3). You will get result like the following:
Be aware that this post is not a tutorial, but you will find all the information you need from attached references (tutorial blogs, YouTube videos, etc) and the comments I wrote in source files. Unusually, I decided to use compute shaders because I develop on Metal API and it does not support geometry shaders. Don’t worry! It is much easier to implement the same effect in a geometry shader (less 1,000 lines of code I believe).
How To Set Up (TL;DR)
You can use the shaders and scripts I wrote right away. To make the shaders more usable in games, I paint the grass with the help of the painter tool made by MinionsArt. Check out the website if you are interested in learning how the tool works from behind. I made some changes to the two original files to add shortcut and compute shader support.
Usage
- Download three shader files
- SkylikeGrass.shader (shader file)
- SkylikeGrass.hlsl (main shader logic that contains
vertexandfragmentfunctions) - SkylikeGrassCompute.compute (compute shader)
- Create two materials that use
Grass/SkylikeGrassshader.SkylikeStripMaterialand set the strip textureSkylikeCircleMaterialand set the circle texture- After importing texture files, go to inspector:
- Check
Alpha Is Transparency - Set
Wrap ModetoClamp
- Check
- Set up painter tool and renderer
- Download SkylikeGrassPainter.cs and import
- Download SkylikeGrassPainterEditor.cs and put it to
Assets/Editor - Download SkylikeGrassComputeRenderer.cs and import
- Set up painting
- Create a plane where the painter tool draws on
- Create an empty game object
- Add
SkylikeGrassPainterscript component - Add
SkylikeGrassComputeRendererscript component - Manually set material and compute shader accordingly
- Add
- Start painting!
- Make sure the empty game object is selected
- Paint grass by holding any modifier key (e.g.
Shift,Ctrl) andright mouse button - Switch tool with any modifier key (e.g.
Shift,Ctrl) andmiddle mouse button
Hope you are enjoy this shader in your game! To get rid of setup overhead, it would be convenient if you prefab the empty object with a particular material, then next time you just drag the prefab to the scene to start painting. All the presets will be stored.
In addition, if you want to bring in interactive effect, download ShaderInteractor.cs and attach it to your player object. You can find the original file from MinionsArt’s website as well.
Painter Tool
The painter tool is defined in SkylikeGrassPainter.cs and SkylikeGrassPainterEditor.cs. Whenever you plant some grass on the ground, it will create a new mesh and store vertices which contain the information needed in our compute shader. Then this mesh will be accessed from SkylikeGrassComputeRenderer which uploads the data to compute shader. At the end of SkylikeGrassPainter, there are few lines doing the mesh work.
1 | // set all info to mesh |
MeshTopology.Points indicates that the program will treat vertices individually. This makes sense since grass only spawns on a particular location.
Beside vertices, we store size multipliers inside UV0 (channel 0). This Vector2 allows us to assign particular size to each vertex. Therefore, without changing the grass size in SkylikeGrassComputeRenderer, we can use the painter tool to vary grass size easily. This applies to grass color as well.
Again, to know more about the tool, please check out MinionsArt’s website.
- Geometry Grass Shader + Tool video + update (by MinionsArt)
Compute Shader
Learning Resources
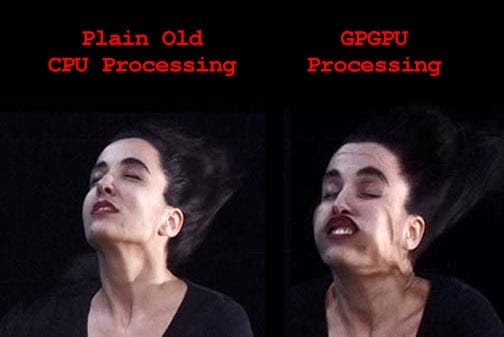
Compute shaders provide the possibility that we can send processing tasks from CPU to GPU. These tasks include but is not limited to procedural generation (e.g. terrain creation), physics simulation, etc. In our case, we use them to replace the role of geometry shader in the graphics pipeline. Compute buffers are the places where these two processing units communicate data. We will define some data structures here.
There are a bunch of great tutorials regarding compute shaders. I recommend going over the following videos in order to have a conceptual and practical overview of this technique.
- Getting Started with Compute Shaders in Unity (by Game Dev Guide)
- Intro to Compute Shaders in Unity URP! Replace Geometry Shaders (by NedMakesGames)
From the first video, you basically learn what compute shader is and how it works. From the second one, it is more like a step-by-step tutorial that teaches you to create an interesting effect. The author also made several follow-up videos on using compute shaders in practice.
To be honest, once you have done the second one, you will find the setup very intimidating. Unlike using geometry shaders, everything has to be defined manually, which makes the code a bit lengthy and tedious. Also, during the procress you have to be careful, because it could be difficult to find out why it does not work. From my experience in Unity 2019 4.18 f1, it makes Unity crash more frequently as well.
Therefore, one tip is that if you execute the renderer script in [ExecuteInEditMode] every time before you update the script you’d better disable the object first and enable it after you believe the code is right.
Rendering Workflow
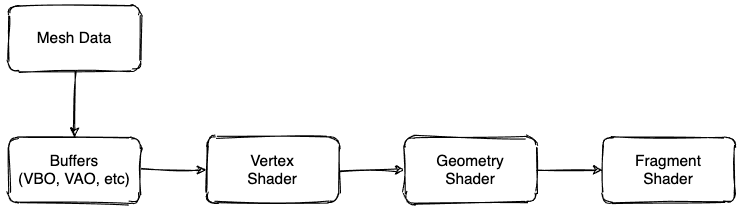
Once you are familiar with compute shaders, it is time to apply them to actual usage. Let us first recall what the rendering flow looks like if you use the geometry shader. Data from a mesh is uploaded to GPU’s buffers and gets passed down from vertex shaders to fragment shaders. Actually there are other shaders in between but here we just ignore them for now. The geometry shader is placed in the middle.
However, if we use compute shaders to implement the same functionality, the ordering is quite different. In this case, the compute shader goes first. We use C# script to upload mesh data from CPU to GPU and to trigger the compute shader to start processing the data. This data will then be stored in a specific compute buffer from which the vertex shader can read the processed data (vertices and triangles). Compute Shaders are not placed between vertex and fragment shaders.
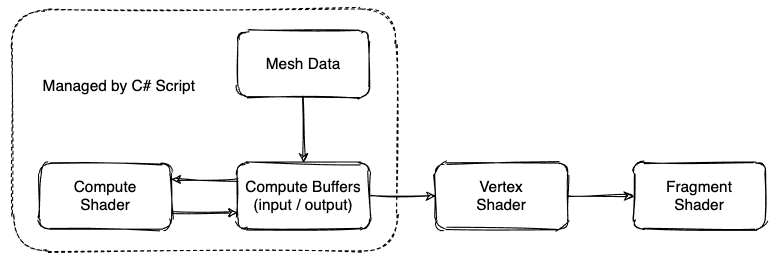
As a novice to this topic, I felt confused because I did not notice the difference and still had the original workflow in my mind. Again, once you notice the difference, you will understand why those data structures in compute buffers are defined in such ways.
Compute Shader Setup
[Source Code] SkylikeGrassCompute.compute
To write a compute shader for our grass, we first need to define some structures to manage the data. Again, if you find something not being described here, please go through the two videos about compute shaders first!
1 | struct SourceVertex |
SourceVertex represents the data from the mesh (remember the mesh is created by the painter tool). DrawVertex and DrawTriangle represent the data generated from this compute shader and they should be redefined in the vertex shader. Then we have the buffers as follows:
1 | StructuredBuffer<SourceVertex> _SourceVertices; |
After that, we define some variables before writing the kernel function. They will be set up by the renderer script.
1 | int _NumSourceVertices; |
Note that in a compute shader we cannot access many built-in shader variables and functions such as _Time, UNITY_MATRIX_M, etc. We have to define them by ourselves and set them via C# scripts. It is a mistake you might make. Therefore, I recommend not including these .hlsl files at the first place. If you plan to use them, make sure the variables or functions you use are supported in compute shaders.
1 |
Grass Texture Plane
Before moving to the renderer section, let us understand how to draw the triangles needed to hold the grass texture.
If you are new to shader scripts, I suggest going over the following tutorials:
- Intro to Shaders (by Cyanilux)
- Grass Shader (by Roystan)
- Unity URP Shader Examples
The first one teaches you HLSL shaders from scratch, while the second one is a good practical tutorial to help you get more familiar with shader scripts and geometry shader (but it is not written for URP). Unity URP shader examples are also a great place where you can find answers to your questions.
To display a texture, we need two triangles to make up a plane to hold the texture. At the end of the shader, we append these two triangles (six vertices) to _DrawTriangles buffer.
Size Variations
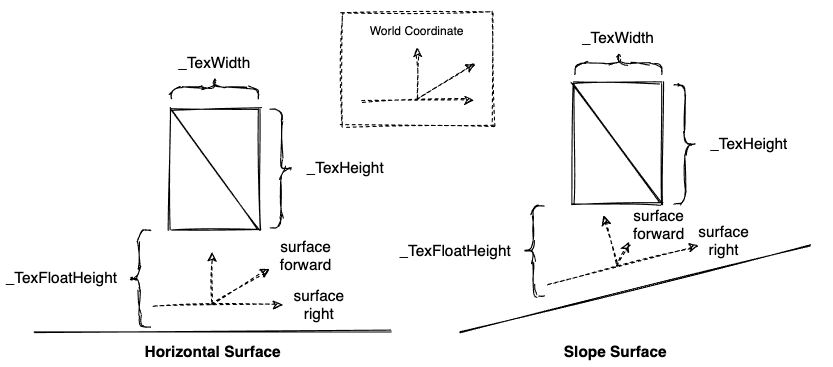
Texture size is defined by _TexWidth and _TexHeight. The size can further be changed by two ways:
- Multipliers from painter brush
- Randomness
1 | _TexWidth *= sv.uv.x; // width multiplier |
Vertex positions are defined by _TexFloatHeight, size, and absolute world directions (world up, world right). Rotating the object does not affect the rotation of grass.
Wind
To apply swaying effect on grass, vertex positions are changed based on _CurrentTime. However, rather than using absolute world directions, we go with directions based on the surface (something like the basis vectors in tangent space).
1 | float3 v0 = sv.positionOS.xyz; |
The variable windLeaningOffset controls the amount of distance that the grass leans. Currently it just leans randomly. If you are interested in making the effect that the grass leans towards the direction it moves, check out the code here. It is a bit tricky to get the actual moving direction because we will apply billboard effect to the grass in the vertex shader, which make it always face the camera.
Interactivity
The code snippet comes from here. It is straightforward.
1 | // Interactivity |
LOD
Applying LOD is a great way to improve performance in a large outdoor environment. When the distance between the grass and the camera is greater than _HideDistance, the grass does not show up.
1 | float3 positionWS = mul(_LocalToWorld, float4(sv.positionOS, 1)).xyz; |
Combined
With all the offset calculations above, it is ready to put them into a function and set up the output data.
1 | // Generate each vertex for output triangles |
Renderer Setup
[Source Code] SkylikeGrassComputeRenderer.cs
At this time, we have finished writing the compute shader. Rather than using MeshRenderer, we write up our own renderer script to execute the task in the compute shader and trigger drawing methods.
1 | [] |
Vertex Shader
[Source Code] SkylikeGrass.shader, SkylikeGrass.hlsl
Following the tutorial made by NedMakesGames, I found that splitting code into .shader and .hlsl files is a good way to organize lengthy shader code. In the .shader file, it mainly sets up SubShader, Pass, and enable keywords we need. In the .hlsl file, it first defines the buffer and structures we used before in the compute shader, which are DrawVertex and DrawTriangle. After that, it contains vertex and fragment functions.
Unlike many other vertex functions, in our case we retrieve the data by SV_VertexID. Once we have the data, we set it up in a v2f struct so the fragment function is able to retrieve the data it needs.
1 | v2f vert(uint vertexID : SV_VertexID) |
To achieve the billboard effect, we need to transform vertex positions such that the plane is always facing our main camera. There are already a bunch of methods existing on the Internet. I found the following video helpful.
- Unity Shader Tutorial - Billboard Shader (by Aperium)
1 | // Billboard |
This code is pretty much the same with the one in the video. The pivot position of the grass plane is calculated in the compute shader.

Personally, I did not completely understand all the detail, but I think it has something to do with the view matrix. It has changed what the matrix previously does such that it can rotate the grass plane towards us. Note that in the illustration it just ignores flipping, which is explained in the video. If you know this well, please teach me in the comment!
Fragment Shader
[Source Code] SkylikeGrass.shader, SkylikeGrass.hlsl
In fragment shader, base color is lerped between _BaseColor and _TopColor based on the Y texture coordinate. I use two colors here but you can definitely turn it into one only. By multiplying the result with brush color, we are able to override the color for each grass entity via the painter tool.
Both ambient and diffuse components contribute to final color. You can tweak ambient strength to make it look good in a night scene, then increase diffuse strength to what you want. Setting a larger diffuse color sometimes gives you better result if you have bloom effect enabled.
1 | Light mainLight = GetMainLight(); |
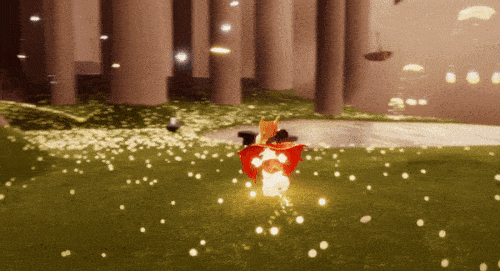
If you watch the grass carefully in Sky, you should notice that the grass is highlighted when players tramping on top of it. It is a subtle effect but I found it very interesting and the implementation is not difficult once you have the speed percentage along the moving direction of your player object (current speed / max speed).
1 | // Interactor Highlight |
At this point, you should be able to see an opaque and rectangular plane swaying above the surface. To make it look better, we enable alpha testing and transparency in .shader file, sample the alpha channel of the texture, and multiply it with the combined RGB and alpha values.
You can find the texture files at the beginning of this article. If you are a creative person, you can definitely create your own textures to make it more aesthetic.
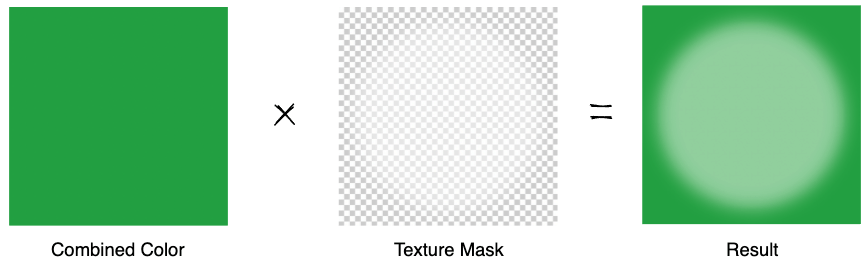
1 | // Texture Mask Color (pure white + alpha) |
Other Stuff
Performance
So far, I have not noticed any performance issue. Although after adding a huge amount of grass to the scene and even at the same time turning off LOD, there is no significant drop of FPS. I will follow up on that if I discover any issue.
Known Issues
- Shadow cast does not work as expected. Currently I do not figure out why. It has some weird effect. If two renderers enable shadow cast at the same time, it starts blinking. However, for my game, I do not intend to enable shadow cast for now.
- In Metal, the console sometimes pops up many warnings, which is annoying. Is it a bug? I haven’t not found a solution to that yet.
Thanks for reading! If you like this grass, please let me know in the comment!
References & Credits
- MinionsArt
- Ned Makes Game
- Game Dev Guide: Getting Started with Compute Shaders in Unity
- Kyle Halladay: Getting Started With Compute Shaders In Unity
- Cyanilux: Intro to Shaders
- Roystan: Grass Shader
- Unity-Technologies: URP Shader Examples
- Aperium: Unity Shader Tutorial - Billboard Shader