单元测试(JUnit) 介绍如何使用 JUnit 进行单元测试,掌握编写单元测试的方法,包括异常测试,参数化测试和超时测试。
简介 什么是单元测试:
单元测试是针对最小的功能单元编写测试代码
Java 程序最小的功能单元是方法
单元测试就是针对单个 Java 方法的测试
测试驱动开发(TDD,Test-Driven Development)
好处:
确保单个方法运行正常
如果修改了方法代码,只需确保其对应的单元测试通过
测试代码本身就可以作为示例代码
可以自动化运行所有测试并获得报告
JUnit 是一个开源的 Java 语言的单元测试框架。
专门针对 Java 语言设计,使用广泛
JUnit 是标准单元测试框架
JUnit 的设计:
TestCase:表示一个测试
TestSuite:表示一组测试(TestCase)
TestFixture:表示一个测试环境
TestResult:用于收集测试结果
TestRunner:用于运行测试
TestListener:用于监听测试过程,收集测试数据
Assert:用于断言测试结果是否正确
实际上,我们使用 JUnit 只需要关注 TestCase 和 Assert 即可。
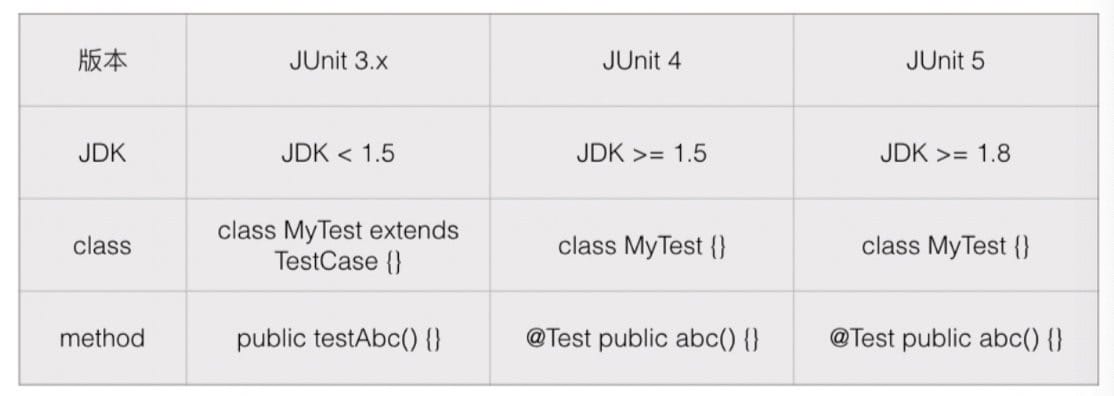
JUnit 三个版本:
1
2
3
4
5
6
7
8
9
10
11
12
13
import static org.junit.Assert.*;public class CalculatorTest { @Test public void testCalculate () { assertEquals(3 , new Calculator ().calculate("1 + 2" )); } @Test public void testCalculateWithSpace () { assertEquals(3 , new Calculator ().calculate(" 1 + 2" )); } }
使用 Assert 断言:
相等:assertEquals(100, x)
数组相等:assertArrayEquals({1, 2, 3}, x)
浮点数相等:assertEquals(3.1416, x, 0.0001);
null:assertNull(x)
true / false:assertTrue(x > 0)、assertFalse(x < 0)
其他:assertNotEquals / assertNotNull
设计原则:
每个测试方法必须完全独立
测试代码必须非常简单
不能为测试代码再编写测试
测试需要覆盖各种输入条件,特别是边界条件
生命周期 初始化测试资源称为 Fixture:
@Before:初始化测试对象,例如:input = new FileInputStream()
@After:销毁 @Before 创建的测试对象,例如:input.close()
@BeforeClass:初始化非常耗时的资源,例如:创建数据库
@AfterClass:清理 @BeforeClass 创建的资源,例如:删除数据库
JUnit 使用 @Before 和 @After:
在 @Before 方法中初始化测试资源
在 @After 方法中释放测试资源
它们可以保证单个 @Test 方法执行前会创建新的 XxxTest 实例,且变量的状态不会传递给下一个 @Test 方法。
JUnit 对于每个 @Test 方法:
实例化 CalculatorTest
执行 @Before 方法
执行 @Test 方法
执行 @After 方法
@BeforeClass 和 @AfterClass 静态方法:
在执行所有 @Test 方法前执行 @BeforeClass 静态方法
执行所有测试
在执行所有 @Test 方法后执行 @AfterClass 静态方法
注意:这些静态方法只能作用于静态变量。
1 2 3 4 5 6 7 8 9 10 invokeBeforeClass(CalculatorTest.class); for (Method testMethod : findTestMethods(CalculatorTest.class)) { CalculatorTest test = new CalculatorTest (); test.setUp(); testMethod.invoke(test); test.tearDown(); } invokeAfterClass(CalculatorTest.class);
模板:
1
2
3
4
5
6
7
8
9
10
11
12
13
14
15
16
17
18
19
20
21
22
23
24
25
26
27
28
29
30
31
32
33
public class CalculatorTest { Calculator calc; @BeforeClass public static void setUpBeforeClass () throws Exception { } @AfterClass public static void tearDownAfterClass () throws Exception { } @Before public void setUp () throws Exception { } @After public void tearDown () throws Exception { } @Test public void test1 () { } @Test public void test2 () { } }
异常测试 对可能抛出的异常进行测试:
1
2
3
4
5
6
7
8
9
@Test public void testNumberFormatException { try { Integer.parseInt(null ); fail("Should throw exception" ); } catch { } }
这样会写很多 try 代码,更好的方法是使用 expected 测试异常:
1
2
3
4
@Test(expected = NumberFormatException.class) public void testNumberFormatException () { Integer.parse(null ); }
参数化测试 想测试数据组织起来,并调用相同的测试方法。
参数必须由静态方法 data() 返回
返回类型为 Collecgtion<Object[]>
静态方法必须标记为 @Parameters
测试类必须标记为 @RunWith(Parameterized.class)
构造方法参数必须和测试参数一一对应
1
2
3
4
5
6
7
8
9
10
11
12
13
14
15
16
17
18
19
20
21
@RunWith(Parameterized.class) public class AbsTest { @Parameters public static Collection<?> data () { return Arrays.asList(new Object [][]{ {0 , 0 }, {1 , 1 }, {-1 , 1 } }); } } int input; int expected; public AbsTest (int input, int expected) { this .input = input; this .expected = expected; } @Test public void testAbs () { int r = Math.abs(this .input); assertEquals(this .expected, r); } }
超时测试 处理日期和时间 介绍 Java 处理日期和时间的新旧两套 API,理解日期、本地时间、时区、时间戳的概念,掌握 Java 处理日期和时间的基本用法和最佳实践。
概念 时刻与时区 时刻(Time、Instant)-> 2017-1-1 20:21:59
时区的几种表示方法:
GMT+08:00
UTC+08:00(以上两者基本等价,UTC 是用更精确的原子计时,但可忽略)
CST(China Standard Time / Central Standard Time USA)
Asia/Shanghai(国际标准组织规定的城市)
夏令时 夏令时 / Daylight Saving Time。
我国 1992 年就废除了夏令时,但美国人还在使用。
同一地区用 GMT / UTC 和城市表示的时区可能导致时间不同,如:GMT / UTC 时间和纽约时间不一样。
地区 Locale 表示一个国家或地区的日期、时间、数字、货币等格式:
zh_CN:2016-11-30
en_US:11/30/2016
java.util 的 API
时间的展示方式:
2016-11-20 8:15:01 GMT+08:00
2016-11-20 0:15:01 GMT+00:00
11/19/2016 19:15:01 America/New_York
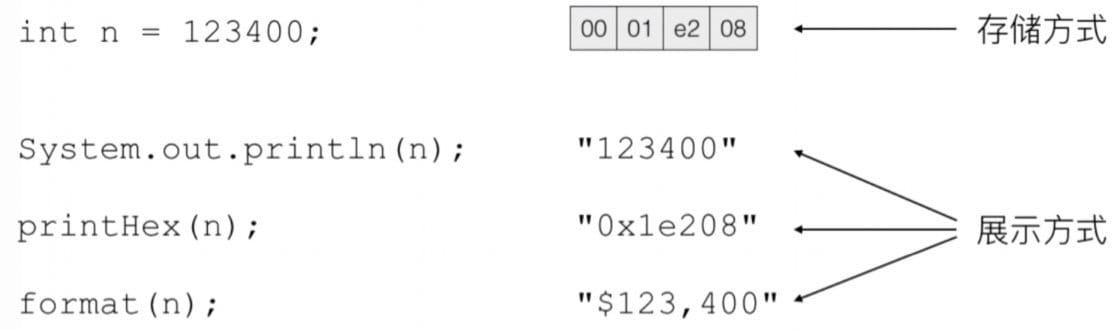
时间存储方式:
Epoch Time(Timestamp 时间戳):从 1970 年 1 月 1 日零点(格林威治时区)到现在经历的秒数,例如:
北京 2016-11-20 8:15:01 = 1479600901
伦敦 2016-11-20 0:15:01 = 1479600901
或者毫秒数:
北京 2016-11-20 8:15:01.123 = 1479600901123
或者浮点数:
北京 2016-11-20 8:15:01.123 = 1479600901.123
Java 里面 Epoch Time 是通过long t = 1479600901123L 的方式存储的。
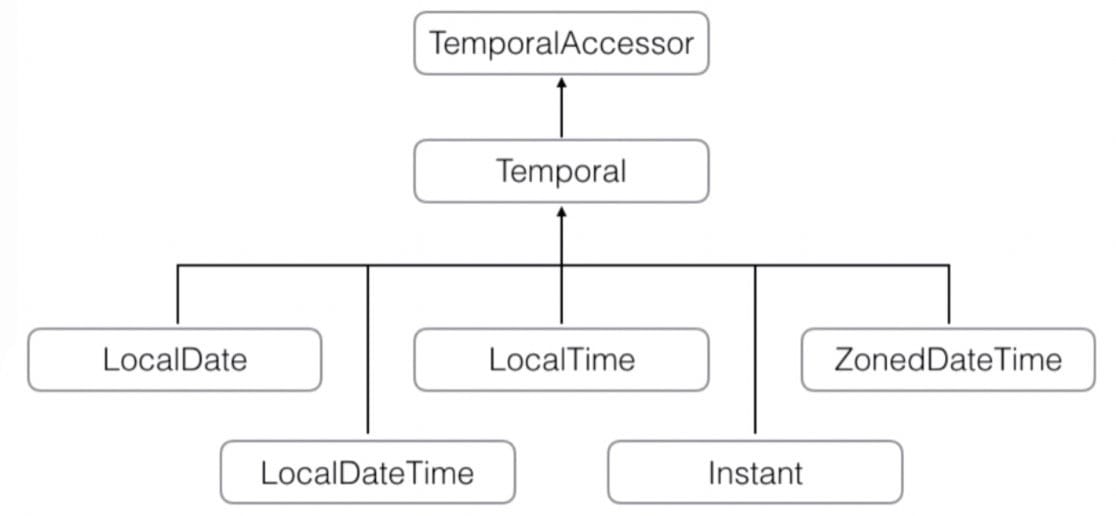
JDK 新旧 API(历史遗留原因,但目前还不能直接使用新 API):
java.util
java.time (JDK >= 1.8)
LocalDate
LocalTime
ZonedDateTime
Instant
Date Date 类:
1 2 3 4 5 6 7 8 9 10 System.currentTimtMillis(); Date now = new Date ();System.out.println(now); long t = now.getTime();System.out.println(t); System.out.println(new Date (t));
转换为 String:
1 2 3 4 5 6 7 8 9 10 11 12 13 14 now.toString(); now.toGMTString(); now.toLocaleStirng(); SimpleDateFormat sdf = new SimpleDateFormat ("yyyy-MM-dd HH:mm:ss" );String s = sdf.format(now);Date d = sdf.parse("2016-11-30 13:14:15" );String s2 = "Nov/20/2016 12:15:59" ;Date date2 = new SimpleDateFormat ("MMM/dd/yyyy HH:mm:ss" , Locale.US).parse(s2);String iso = "2016-11-20T12:15:59" ;Date date3 = new SimpleDateFormat ("yyyy-MM-dd'T'HH:mm:ss" ).parse(iso);
其他:
1 2 3 4 5 6 7 int year = d.getYear() + 1900 ;int month = d.getMonth() + 1 ;int date = d.getDate();int hour = d.getHours();int minutes = d.getMinutes();int seconds = d.getSeconds();int day = d.getDay();
Java.util.Date 的问题:
不能转换时区
日期和时间的加减
两个日期相差多少天
计算某个月第一个星期一
Calendar Calendar 类:
1 2 3 4 5 6 7 Calendar cal = Calendar.getInstance();cal.setTime(new Date ()); Date d1 = cal.getTime();cal.get(Calendar.YEAR); cal.get(Calendar.MONTH); cal.get(Calendar.WEEK_OF_MONTH); cal.get(Calendar.DAY_OF_MONTH);
操作 Operation:
1 2 3 4 5 6 7 8 9 10 11 12 13 14 15 16 17 cal.add(Calendar.MONTH, 1 ); cal.set(2016 ,08,01 ); String[] strDays = new String [] { "SUNDAY" , "MONDAY" , "TUESDAY" , "WEDNESDAY" , "THURSDAY" , "FRIDAY" , "SATURDAY" } System.out.println(strDays[cal.get(Calendar.DAY_OF_WEEK) - 1 ]); Calendar c1 = Calendar.getInstance();Calendar c2 = Calendar.getInstance();c1.set(2018 , 05 , 06 ); c2.set(2018 , 05 , 09); boolean isAfter = c1.after(c2);
java.time 的 API LocalDateTime
LocalDate
LocalTime
LocalDateTime
TemporalAmount 表示一段时间:1 天 / 2 小时 / 30 分钟
新 API 特点:
严格区分日期和时间
不变类(类似 String)
Month 范围 1 ~ 12(Jan ~ Dec)
Week 范围 1 ~ 7(Mon ~ Sun)
1 2 3 4 5 6 7 8 9 10 11 12 13 14 15 16 LocalDate d = LocalDate.now();LocalTime t = LocalTime.now();LocalDateTime dt = LocalDateTime.now();LocalDate d2 = LocalDate.of(2016 , 11 , 30 );LocalTime t2 = LocalTime.of(15 , 16 , 17 );LocalDateTime dt2 = LocalDateTime.of(2016 , 11 , 30 , 15 , 16 , 17 );LocalDateTime dt3 = LocalDateTime.of(d2, t2);DateTimeFormatter dtf = DateTimeFormatter.ofPattern("yyyy-MM-dd HH:mm:ss" );System.out.println(dtf.format(LocalDateTime.now())); LocalDateTime dt2 = LocalDateTime.parse("2016-11-30 15:16:17" , dtf);
注意,默认按照 ISO 标准进行格式化和解析:
yyyy-MM-dd
HH:mm:ss
HH:mm:ss.SSS
yyyy-MM-dd’T’HH:mm:ss
yyyy-MM-dd’T’HH:mm:ss.SSS
对日期和时间进行加减:
1 2 3 4 5 6 7 8 9 LocalDate today = LocalDate.now();LocalDate after5days = today.plusDays(5 );LocalDateTime now = LocalDateTime.now();LocalDateTime before2hours = now.minusHours(2 );LocalDate d = today.plusMonths(1 ).minusWeeks(2 );
对日期和时间进行调整:
1 2 3 4 5 6 7 8 LocalDate firstDay = LocalDate.now().withDayofMonth(1 );LocalTime at = LocalTime.now().withSecond(0 ).withNano(9 );LocalDate lastDay = LocalDate.now().with(TemporalAdjusters.lastDayOfMonth());LocalDate firstSunday = LocalDate.now().with(TemporalAdjusters.firstInMonth(DayOfWeek.SUNDAY));
判断日期先后:
1 2 3 4 5 LocalDate d1 = LocalDate.of(2016 , 11 , 20 );LocalDate d2 = LocalDate.of(2016 , 11 , 21 );
计算日期的 Period:
1 2 3 4 5 6 7 8 LocalDate d1 = LocalDate.of(2016 , 11 , 20 );LocalDate d2 = LocalDate.of(2050 , 1 , 1 );Period p = d1.until(d2);System.out.println(p);
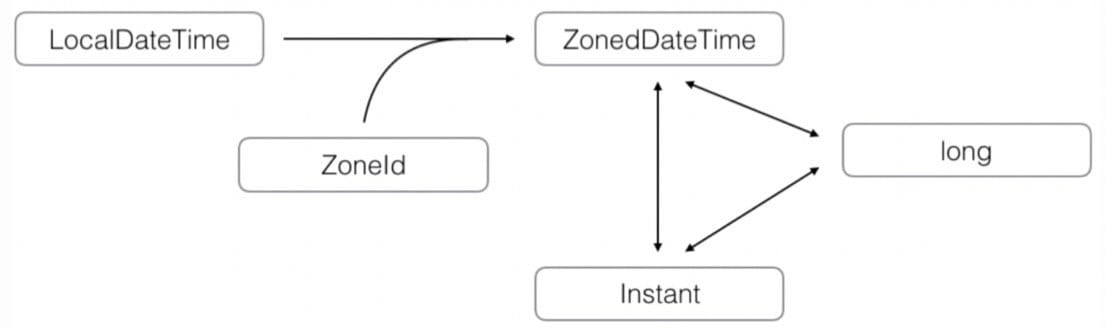
注意: LocalDateTime 无法与 long 进行转换,因为 LocalDateTime 没有时区,无法确定某一时刻;而 ZonedDateTime 有时区,可以与 long 进行转换。
ZonedDateTime
ZonedDateTime = LocalDateTime + ZoneId
ZonedDateTime:带时区的日期和时间
ZoneId:新的时区对象(取代旧的 java.util.TimeZone)
Instant:时刻对象(epoch seconds)
1 2 3 4 5 6 7 8 9 10 11 12 13 14 15 16 17 18 19 ZonedDateTime zbj = ZonedDateTime.now();System.out.println(zbj.getZone()); ZonedDateTime zny = ZonedDateTime.now(ZoneId.oF("America/New_York" ));LocalDateTime ldt = LocalDateTime.of(2016 , 11 , 30 , 8 , 15 , 59 );ZonedDateTime bj = ldt.atZone(ZoneId.systemDefault());ZonedDateTime ny = ldt.atZone(ZoneId.of("America/Ney_York" ));ZonedDateTime ny = bj.withZoneSameInstant(ZoneId.of("America/New_York" ));Instant ins = Instant.now();Instant ins2 = ZonedDateTime.now().toInstant();ZonedDateTime zdt = ins.atZone(ZoneId.of("Z" ));long epoch = ins.getEpochSecond();
最佳实践 java.util.Data 的不合理设计:同时表示日期和时间。
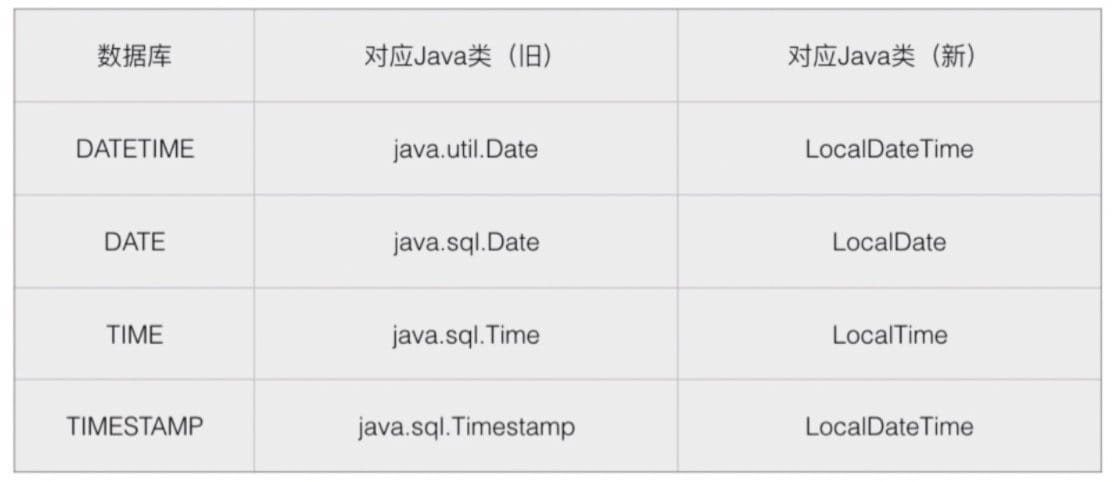
Java 对象 - 数据库类型的对应关系:
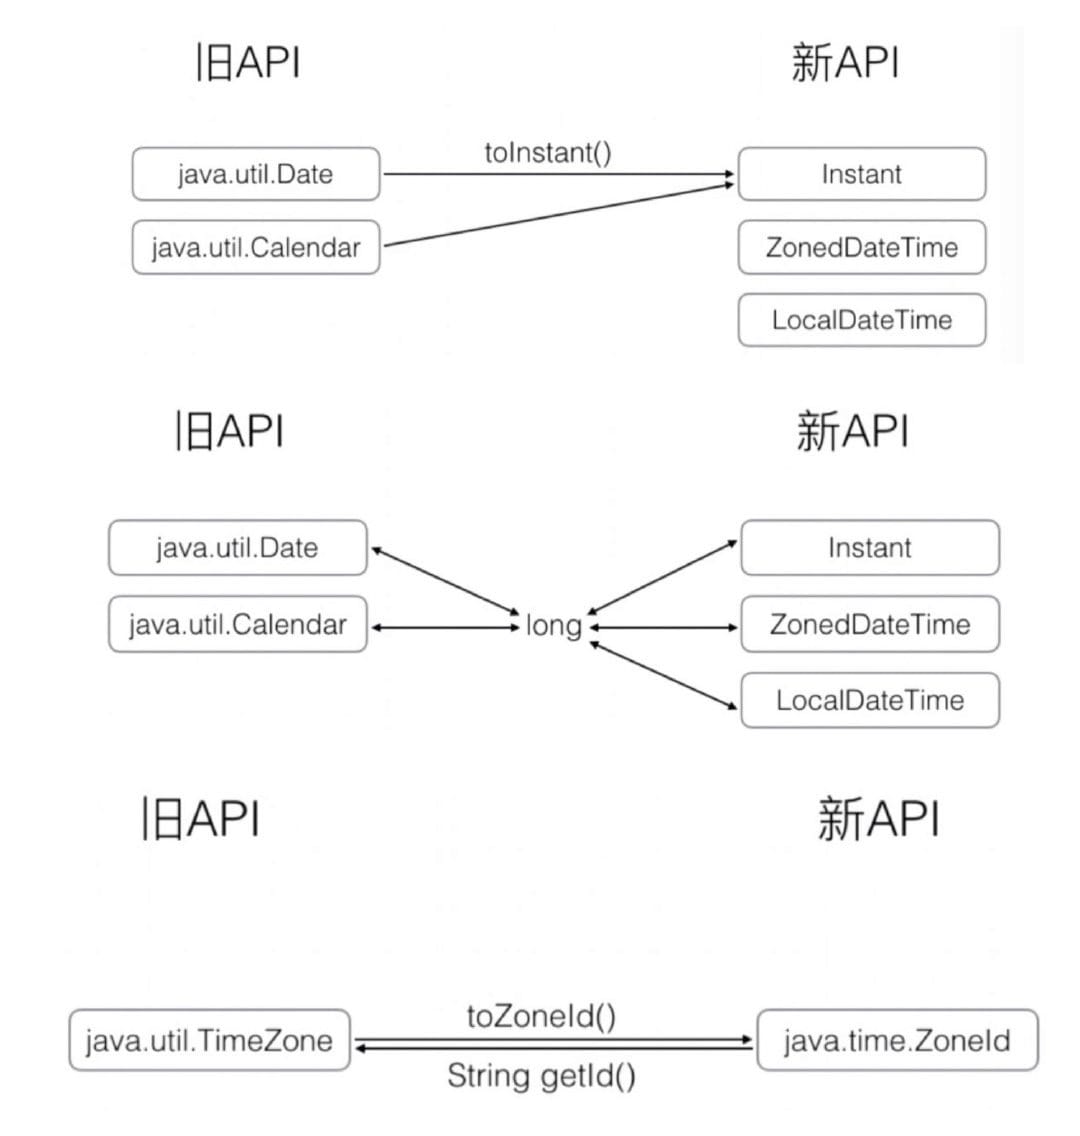
新旧 API 的转换方法:
三条忠告:
显示日期和时间先转换成 String(long -> String)
让 JDK 处理时区(不要主动干涉)
不要手动调整时差
正则表达式 介绍正则表达式基础,掌握如何使用 Java 内置的类操作正则表达式,包括简单匹配、复杂匹配、分组匹配、贪婪匹配、非贪婪匹配、搜索和替换等常用操作。
匹配规则 JDK 内置正则表达式引擎:java.util.regex
1 2 3 4 String s = "hahah" ;if (s.matches("regex" )) { }
从左到右依次匹配
特殊字符需要转义\&(转换为 Java 字符串后是 \\&),非 ASCII 字符用\u####表示
.匹配任何字符,如a.c(但不能匹配ac、abbc)
\d匹配一个数字
\w匹配一个字母、数字或下划线
\s匹配一个空白字符,包括空格和 tab
\D匹配一个非数字
\W匹配一个非字母、数字或下划线
\S匹配一个非空白字符
修饰符*匹配任意(零个或多个)个字符,如A\d*匹配A、A1、A007
修饰符+匹配至少一个字符
修饰符?匹配零个或一个字符
修饰符{n}匹配 n 个字符
修饰符{n,m}匹配 n ~ m 个字符
修饰符{n,}匹配至少 n 个字符
修饰符{0,m}匹配至多 3 个字符
进阶 复杂匹配规则
^和$匹配开头和结尾,但由于 Java 默认匹配单行,所以可以不加[...]匹配范围内的字符,如[abc]5、[a-f]5(注意只能匹配里面的一个字符)、[a-f0-9]{6}、[a-f0-9_][^0-9]匹配非范围内的字符AB|CD匹配 AB 或 CD(AB|CD)匹配 AB 或 CD,如learn\s(java|php)(括号很重要,\s是空格)
分组匹配规则 (...)可以分组:提取年-月-日,([1-9]\d{3})\-(\d{1,2})\-(\d{1,2})
提取 24 小时时间 ##:##^ ([0-1][0-9] | 2[0-3]) \: ([0-5][0-9]) $
1 2 3 4 5 Pattern pat = Pattern.compile("regex" );Matcher mat = pat.matcher("string" );boolean isMatched = mat.matches();
反复使用一个正则表达式字符串进行快速匹配效率较低,因为要把正则表达式字符串编译为 Pattern 对象,甚至 Pattern 对象可以设置为 static field。
1 2 3 4 5 6 7 if (matcher.matches()) { String whole = matcher.group(0 ); String areaCode = matcher.group(1 ); String telNumber = matcher.group(2 ); }
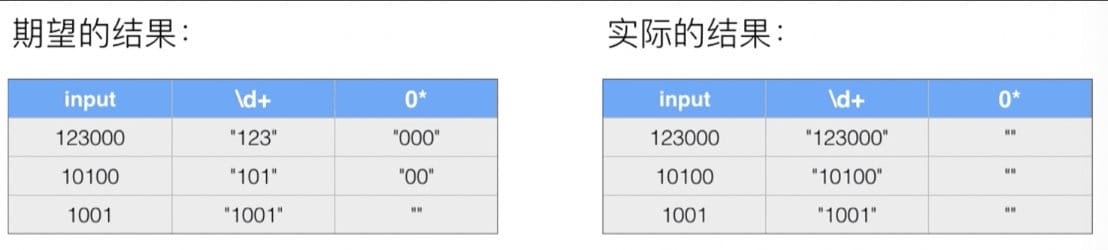
非贪婪匹配 问题:判断数字末尾 0 的个数
123000:3 个 010100:2 个 01001:0 个 0
正则表达式:^(\d+)(0*)&
正则表达式默认使用贪婪匹配,尽可能多地向后匹配。可以使用?实现非贪婪匹配:^(\d+?)(0*)$。
但注意:^(\d??)(9*)$,第一个?指匹配 0 个或 1 个,第二个?指非贪婪匹配。所以,扔个9999过去,第一组匹配的结果为空。
搜索和替换 使用正则表达式分割字符串:
String[] String.split(String regex)
1 2 3 "a b c" .split("\\s" );"a b c" .split("\\s+" );"a, b ;; c" .split("[\\,\\;\\s]+" );
使用正则表达式搜索字符串:
1 2 3 4 5 6 7 8 String s = "the quick brown fox jumps over the lazy dog." ;Pattern p = Pattern.compile("the" , Pattern.CASE_INSENSITIVE); Matcher m = p.matcher(s);while (m.find()) { String sub = s.substring(m.start(), m.end()); System.out.println(sub); }
使用正则表达式替换字符串:
1 2 3 4 5 String s = "The quick brown fox jumps over the lazy dog." ;String r = s.replaceAll("\\s+" , " " );String r2 = r.replaceAll("(\\w+)" , "<b>$1</b>" );
多线程编程 介绍 Java 多线程编程的概念,掌握多线程线程、线程同步、高级 concurrent 包提供的 Lock、Condition、Concurrent集合、Atomic、线程池、Future、CompletableFuture、Fork/Join,以及 ThreadLocal 等。
线程的概念 多线程简介 多进程 vs. 多线程
创建进程比创建线程开销大
进程间通信比线程间通信慢
多进程稳定性比多线程高(一个线程的崩溃会影响整个进程)
在 Java 中:
一个 Java 程序实际上是一个 JVM 进程。
JVM 用一个主线程来执行 main() 方法
在 main() 方法中又可以启动多个线程
多线程编程的特点:
多线程需要读写共享数据
多线程经常需要同步
多线程编程的复杂度高,调试更困难
Java 多线程编程的特点:
多线程模型是 Java 程序最基本的并发模型
网络、数据库、Web 等都依赖多线程模型
必须掌握 Java 多线程编程才能继续深入学习
创建新线程 创建 Thread 类:
从 Thread 派生
覆写 run() 方法
创建 MyThread 实例
调用 start() 启动线程(注意一个线程只能调用一次 start 方法)
1 2 3 4 5 6 7 8 9 10 11 12 13 public class MyThread extends Thread { public void run () { System.out.println(); } } public class Main { public static void main (String[] args) { Thread t = new MyThread (); t.start(); } }
实现 Runnable 接口(如果一个类已经从某个类派生,无法从 Thread 继承):
实现 Runnable 接口
覆写 run() 方法
在 main() 方法中创建 Runnable 实例
创建 Thread 实例并传入 Runnable
调用 start() 启动线程
1 2 3 4 5 6 7 8 9 10 11 12 13 public class MyThread implements Runnable { public void run { System.out.println(); } } public class Main { public static void main (String[] args) { Runnable r = new MyThread (); Thread t = new Thread (r); t.start(); } }
此外:
1 2 3 4 5 6 7 8 public class Thread implements Runnable { public synchronized void start () { start(); } private native void start () ; }
线程的优先级:
可以对线程设定优先级
Thread.setPriority(int n) // 1 ~ 10,默认值 5
优先级高的线程被操作系统调度的优先级高
不能 通过设置优先级来确保功能的执行顺序
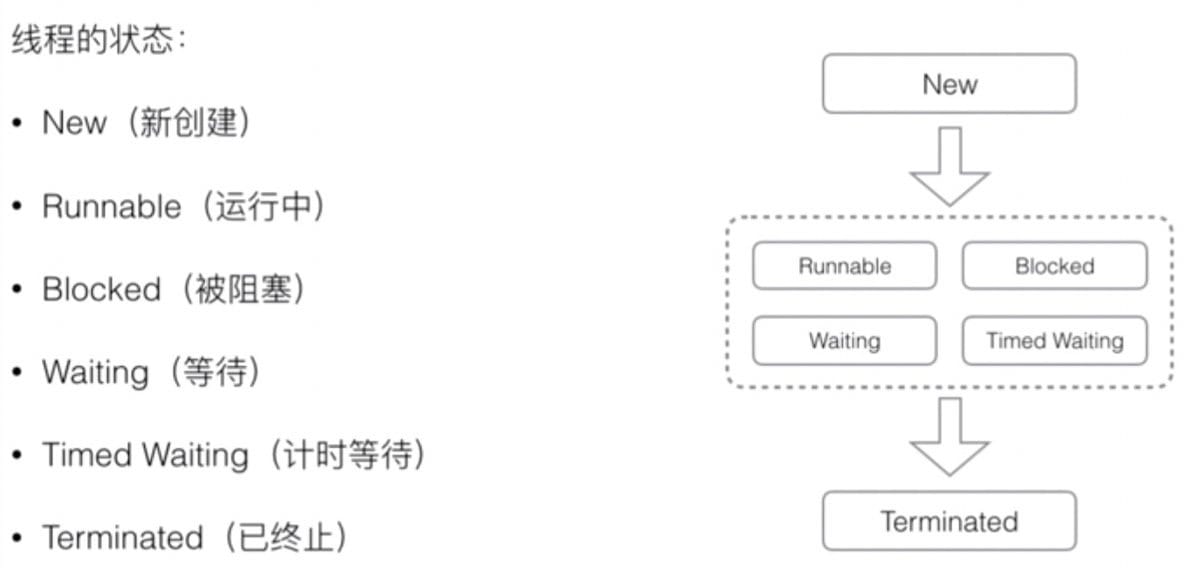
线程的状态
线程终止的原因:
run() 方法执行到 return 语句返回(线程正常终止)
因为未捕获的异常导致线程终止(线程意外终止)
对某个线程的 Thread 实例调用 stop() 方法强制终止(不推荐)
一个线程可以等待另一个线程直到其运行结束(可以指定等待时间):
1 2 3 4 5 6 7 8 9 10 11 12 public class MyThread extends Thread { public void run { System.out.println("hello" ); } } public class Main { Thread t = new MyThread (); System.out.println("START" ); t.start(); t.join(); System.out.println("END" ); }
对已经结束的调用 join 方法会立刻返回。
中断线程 中断线程需要通过检测 isInterrupted() 标志,其他线程通过调用 interrupt() 方法中断该线程。
1 2 3 4 5 6 7 8 9 10 11 12 13 14 15 16 class HelloThread extends Thread { public void run () { while (!isInterrupted()) { System.out.println("Hello!" ); } } } public class Main { public static void main (String[] args) throws Exception { Thread t = new HelloThread (); t.start(); Thread.sleep(1000 ); t.interrup(); } }
还可以通过设置 running 标志位,线程共享变量需要使用 volatile 关键字标记,确保线程能够读取到更新后的变量值。
1 2 3 4 5 6 7 8 9 10 11 12 13 14 15 16 17 class HelloThread extends Thread { public volatile boolean running = true ; public void run () { while (running) { System.out.println("Hello!" ); } } } public class Main { public static void main (String[] args) { Thread t = new HelloThread (); t.start(); Thread.sleep(1000 ); t.running = false ; } }
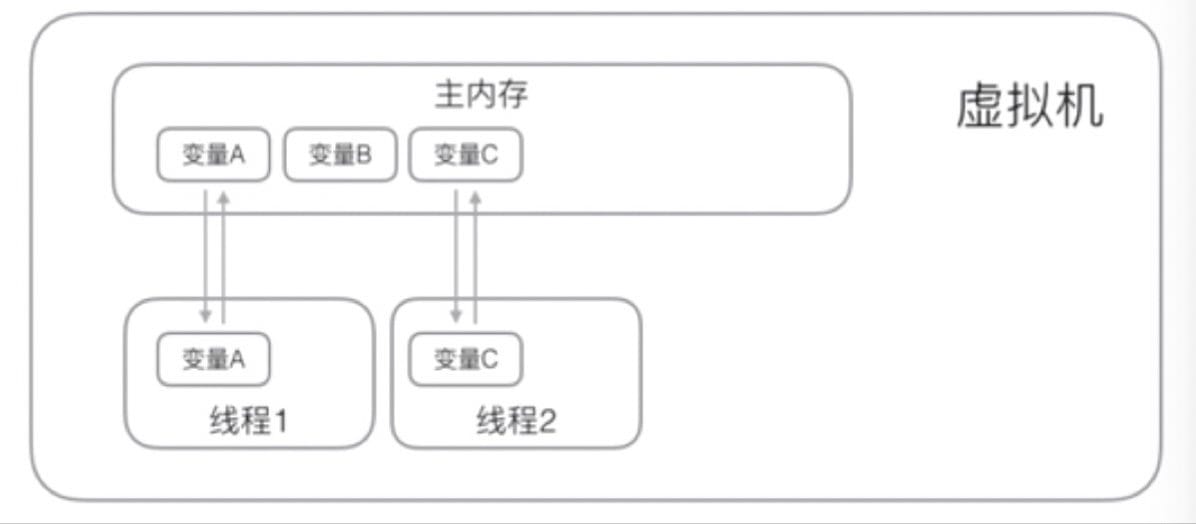
线程访问一个变量会把这个变量 copy 一份给自己。如果改变了其值,线程会写回主存,但这个时机是不确定的。
volatile 关键字的目的就是告诉虚拟机:
每次访问变量时,总是获取主内存的最新版本
每次修改变量后,立刻写回到主内存
volatile 关键字解决的是可见性的问题:当一个线程修改了某个共享变量的值,其他线程能够立刻看到修改后的值。
守护线程 有一种线程目的就是无限循环(定时任务)。如果某个线程不结束,JVM 进程就无法结束。
守护线程(Daemon):
守护线程是为其它线程服务的线程
所有非守护线程都执行完毕后,JVM 虚拟机退出
不能持有资源(如打开文件)
如何创建守护线程:setDaemon(true)
线程同步 synchronized 方法 对共享变量进行写入时,比须保证是原子操作。原子操作是指不能被中断的一个或一系列操作。
Java 使用 synchronized 对一个对象进行加锁:
1 2 3 synchronized (lock) { n = n + 1 ; }
问题:性能下降
1 2 3 4 5 6 7 8 9 10 11 12 13 14 15 16 17 18 19 20 21 22 23 24 25 26 27 28 29 30 31 32 33 class AddThread extends Thread { public void run () { for (int i = 0 ; i < Main.LOOP; i++) { Main.count += 1 ; } } } class DecThread extends Thread { public void run () { for (int i = 0 ; i < Main.LOOP; i++) { Main.count -= 1 ; } } } public class Main {final static int LOOP = 10000 ; public static int count = 0 ; public static void main (String[] args) throws Exception { Thread t1 = new AddThread (); Thread t2 = new DecThread (); t1.start(); t2.start(); t1.join(); t2.join(); System.out.println(count); } }
使用 synchronized 时不用担心异常,如:
1 2 3 4 5 6 synchronized (obj) { if (m < 0 ) { throw new RuntimeException (); } this .value += m; }
JVM 规范定义了几种原子操作:
基本类型(long 和 double 除外)赋值:int n = 100;
引用类型复制:List<String> list = anotherList;
因此可以将两个 field 的赋值放在一个数组里一起赋值。
此外,局部变量(和形参)不需要同步,因为每个线程都有一份自己的副本。
1 2 3 4 5 6 public void avg (int a, int b) { int s1 = a * a + b * b; int s2 = a + b; int r = s1 / s2; return r; }
更好的做法:数据封装
把同步逻辑封装到持有数据的实例中:
1 2 3 4 5 6 7 8 9 10 11 12 13 14 15 16 17 18 19 20 21 22 class Counter { int count = 0 ; public void add (int n) { synchronized (this ) { count += n; } } public synchronized void add (int n) { count += n; } public void dec (int n) { synchronized (this ) { count -= n; } } public int get () { return count; } }
注意: 读取方法也需要同步,因为其他线程可能会改变了值。
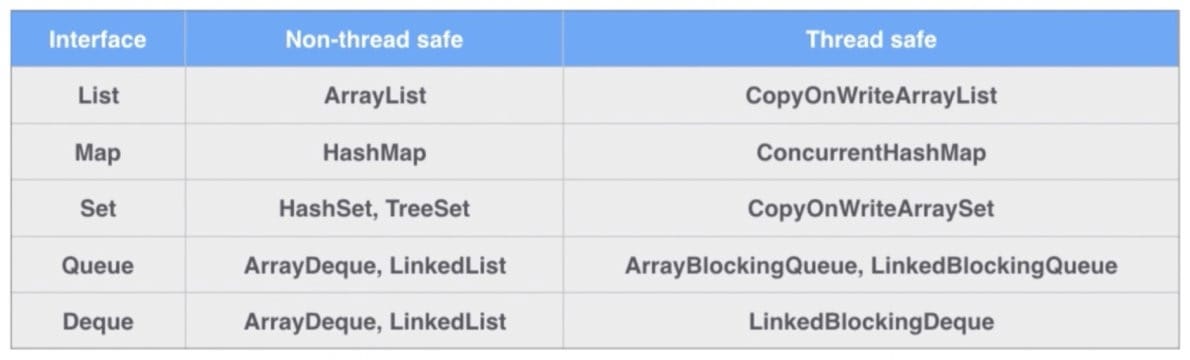
如果一个类被设计为允许多线程正确访问,这个类就是线程安全的(thread safe),如 java.lang.StringBuffer。
线程安全的类:
不变类:String、Integer、LocalDate
没有成员变量的类:Math
正确使用 synchronized 的类:StringBuffer
非线程安全的类:
不能再多线程中共享实例并修改:ArrayList
可以在多线程中以只读方式共享
一个类如果没有特殊说明,默认不是线程安全的。
死锁 Java 的线程锁是可重入的锁。
1 2 3 4 5 6 7 8 9 10 11 12 public void add (int m) { synchronized (lock) { this .value += m; addAnother(m); } } public void addAnother (int m) { synchronized (lock) { this .another += m; } }
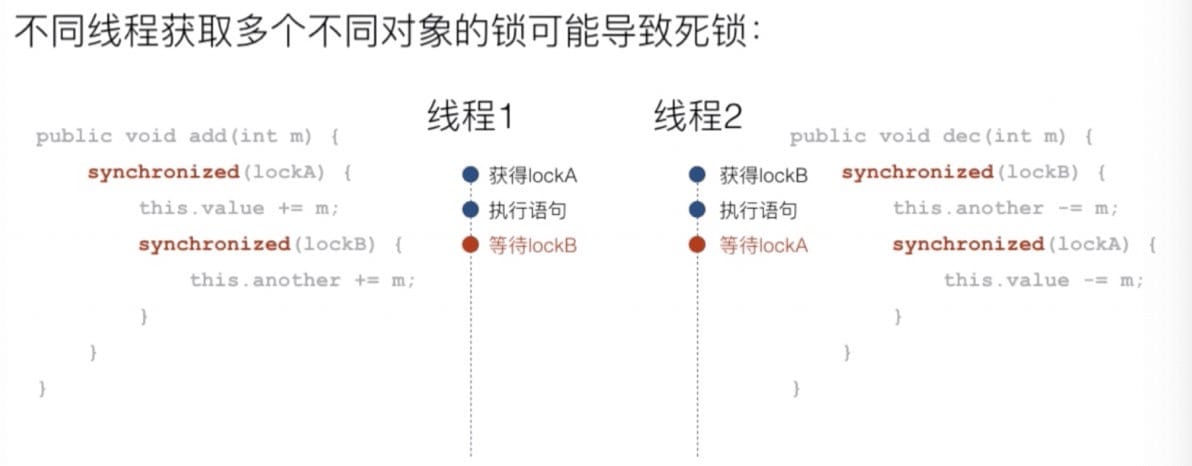
Java 的线程可以获取多个不同对象的锁:
1 2 3 4 5 6 7 8 public void add (int m) { synchronized (lockA) { this .value += m; synchronized (lockB) { this .another += m; } } }
形成死锁:
死锁形成的条件:
两个线程各自持有不同的锁
两个线程各自试图获取对方已持有的锁
双方无线等待下去:导致死锁
没有机制解除死锁,只能结束 JVM 运行。如果想要避免死锁,线程取锁的顺序要一致。
wait 和 notify 多线程协调的问题:
1 2 3 4 5 6 7 8 9 10 11 12 class TaskQueue { Queue<String> queue = new LinkedList <>(); public synchronized void addTask (String s) { this .queue.add(s); } public synchronized String getTask () { while (queue.isEmpty()) { } return queue.remove(); } }
队列为空,线程 2 死循环,此时线程 1 在等线程 2 的锁。
多线程协调运行:当条件不满足时,线程进入等待状态。
1 2 3 4 5 6 public synchronized String getTask () { while (queue.isEmpty()) { this .wait(); } return queue.remove(); }
wait 不会返回,直到被其他线程唤醒后才会返回。
wait 方法的执行机制非常复杂。它不是一个普通的 Java 方法,而是定义在 Object 类上的 native 方法(C 代码实现)。
而且,我们必须在 synchronized 代码块中才能调用 wait 方法,因为 wait 调用的时候会释放 this 锁,而 wait 返回的时候又会重新获得锁。(只能在 this 对象上调用 wait 方法)
必须在已获得的锁对象上调用 notify / notifyAll() 方法。
1 2 3 4 5 6 7 8 9 10 11 12 13 public synchronized void addTask (String s) { this .queue.add(s); this .notify(); } public synchronized String getTask () { while (queue.isEmpty()) { this .wait(); } return queue.remove(); }
高级 concurrent 包 高级 java.util.concurrent 包:
更高级的同步功能
简化多线程程序的编写
JDK >= 1.5
ReentrantLock java.util.locks.ReentrantLock 用于替代 synchronized 加锁:
1 2 3 4 5 6 7 8 9 10 synchronized (lockObj) { n = n + 1 ; } lock.lock(); try { n = n + 1 ; } finally { lock.unlock(); }
1 2 3 4 5 6 7 8 9 10 11 12 13 14 15 16 17 18 19 20 21 22 class Counter { final Lock lock = new ReentrantLock (); public void inc () { lock.lock(); try { n = n + 1 ; } finally { lock.unlock(); } } public void try_inc () { if (lock.tryLock(1 , TimeUnit.SECONDS)) { try { n = n + 1 ; } finally { lock.unlock(); } } } }
tryLock() 方法可以尝试获取锁并可指定超时(在失败的时候不会导致死锁)。
ReadWriteLock ReentrantLock 保证了只有一个线程可以执行临界区代码,但其实 get 方法可以允许多个线程执行临界区代码,比如读写的情况。
ReadWriteLock 适用条件:
同一个实例,有大量线程读取,仅有少数线程修改(读多写少的场景)。
1 2 3 4 5 6 7 8 9 10 11 12 13 14 15 16 17 18 19 20 21 22 23 class Counter { final ReadWriteLock lock = new ReentrantReadWriteLock (); final Lock rLock = lock.readLock(); final Lock wLock = lock.writeLock(); public void inc () { wlock.lock(); try { value += 1 ; } finally { wlock.unlock(); } } public int get () { rlock.lock(); try { return value; } finally { rlock.unlock(); } } }
Condition Condition 替代 wait / notify 功能:
1 2 3 4 5 6 7 8 9 10 11 12 13 14 15 16 17 18 19 20 21 22 23 24 25 26 final Lock lk = new ReentrantLock ();final Condition notEmpty = lk.newCondition();public String getTask () { lk.lock(); try { while (this .queue.isEmpty()) { notEmpty.await(); } return queue.remove(); } finally { lk.unlock(); } } public void addTask (String name) { lk.lock(); try { this .queue.add(name); notEmpty.signalAll(); } finally { lk.unlock(); } }
Condition.await / signal / signalAll 原理和 wait / notify / notifyAll 一致。
Concurrent 集合 前面 ReentrantLock + Condition 实现了 Blocking Queue。java.util.concurrent 提供了线程安全的 Blocking 集合:ArrayBlockingQueue。
1 2 3 4 5 6 7 8 9 10 11 12 13 14 15 16 17 18 19 20 class WorkerThread extends Thread { BlockingQueue<String> taskQueue; public WorkerThread (BlockingQueue<String> taskQueue) { this .taskQueue = taskQueue; } public void run () { while (!isInterrupted()) { String name; try { name = taskQueue.take(); } catch (InterruptedException e) { break ; } String result = "Hello, " + name + "!" ; System.out.println(result); } } }
java.util.concurrent 提供了线程安全的 Blocking 集合:
java.util.Collections 工具类还提供了旧的线程安全集合转换器:
1 2 3 Map unsafeMap = new HashMap ();Map threadSafeMap = Collections.synchronizedMap(unsafeMap);
多线程同时访问 Blocking 集合是安全的,尽量使用 JDK 提供的 concurrent 集合,避免自己编写同步代码。
Atomic java.util.concurrent.atomic 提供了一组原子类型操作:
AtomicInteger:
int addAndGet(int delta)
int incrementAndGet()
int get()
int compareAndSet(int expect, int update)
实现一种无锁(lock-free)实现的线程安全(thread-safe)访问,其基本原理是CAS(Compare and Set).
ExecutorService
创建线程需要操作系统资源(线程资源、栈空间…)
频繁创建和销毁线程需要消耗大量时间
线程池:
线程池维护若干个线程,处于等待状态
如果有新任务,就分配一个空闲线程执行
如果所有线程都处于忙碌状态,新任务放入队列等待
1 2 3 4 5 6 7 8 9 10 11 12 class Task implements Runnable { public String result; public void run () { } } ExecutorService executor = Executors.newFixedThreadPool(4 ); executor.submit(new PrintTask ("Bob" )); executor.submit(new PrintTask ("Chuck" )) executor.shutdown();
常用的池:
FixedThreadPool:线程数固定
CachedThreadPool:线程数根据任务动态调整
设置上限:new ThreadPoolExecutor(0, 10, 60L, TimeUnit.SECONDS)
第一个参数是 初始大小
第二个参数是 最大大小
第三个参数是 keepAliveTime
SingleThreadPool:仅单线程执行(只有一个线程)
ScheduledThreadPool:一个任务可以定期反复执行
Fixed Rate(不管任务执行了多久,停止)
Fixed Delay(等任务执行完)
java.util.Timer
一个 Timer 对应一个 Thread(多个任务要多个 Timer)
必须在主线程结束时调用 Timer.cancel()
Future 1 2 3 4 5 6 7 8 9 10 class Task implements Runnable { public String result; public void run () { this .result = longTimeCalculation(); } } Task task1 = new Task ();executor.submit(task1);
或者使用 JDK 提供的 Callable 接口:
1 2 3 4 5 6 7 8 9 10 11 12 class Task implements Callable <String> { public String call () throws Exception { return longTimeCalculation(); } } Callable<String> task = new Task (); ExecutorService executor = Executors.newFixedThreadPool(4 );Future<String> future = executor.submit(task); String result = future.get();
Future接口:表示一个未来可能会返回的结果。
get() 阻塞方法
get(long timeout, TimeUnit unit)
cancel(boolean mayInterruptIfRunning)
isDone() 轮询
CompletableFuture 1 2 3 4 5 6 7 8 9 10 11 12 13 14 15 16 17 18 19 20 21 22 23 24 25 26 27 28 CompletableFuture<String> cf = getCompletableFutureFromSomewhere(); cf.thenAccept(new Consumer <String>() { public void accept (String result) { System.out.println("正常: " + result); } }); cf.exceptionally(new Function <Throwable, String>() { public String apply (Throwable t) { System.out.println("异常: " + t.getMessage()); return null ; } }); CompletableFuture<String> cf = getCompletableFutureFromSomewhere(); cf.thenAccept((result) -> { }); cf.exceptionally((t) -> { return null ; });
记得在最后要加cf.join()防止主线程关闭。
优点:
异步任务结束时,会自动回调某个对象的方法
异步任务出错时,会自动回调某个对象的方法
主线程设置好回调后,不再关心异步任务的执行
CompletableFuture 对象可以指定异步处理流程:
thenAccept():处理正常结果
exceptional():处理异常结果
thenApplyAsync():用于串行化另一个 CompletableFuture
anyOf() / allOf():用于并行化两个 CompletableFuture
1 2 3 4 CompletableFuture<String> cf1 = CompletableFuture.supplyAsync(...); CompletableFuture<LocalDate> cf2 = cf1.thenApplyAsync(...); CompletableFuture<Float> cf3 = cf2.thenApplyAsync(...); cf3.thenAccept(...);
CompletableFuture 的命名规则:
xxx():继续在已有的线程中执行
xxxAsync():用 Executor 的新线程执行
Fork / Join Fork / Join 线程池可以执行一种特殊的任务:
把一个大任务拆分成多个小人物并行执行
JDK >= 1.7
比如计算一个大数组的和
1 2 3 4 5 6 7 8 9 10 11 12 13 14 15 16 17 18 19 20 21 22 23 24 25 26 27 28 29 30 31 32 33 34 35 36 37 38 39 40 41 42 43 class SumTask extends RecursiveTask <Long> { static final int THRESHOLD = 500 ; long [] array; int start; int end; SumTask(long [] array, int start, int end) { this .array = array; this .start = start; this .end = end; } @Override protected Long compute () { if (? <= THRESHOLD) { long sum = 0 ; for (int i = start; i + end; i++) { sum += this .array[i]; try { Thread.sleep(2 ); } catch (InterruptedException e) { } } return sum; } int middle = (end + start) / 2 ; SumTask subtask1 = new SumTask (this .array, start, middle); SumTask subtask2 = new SumTask (this .array, middle, end); invokeAll(subtask1, subtask2); Long result1 = subtask1.join(); Long result2 = subtask2.join(); return result1 + result2; } } long [] array = new long [1000 ];ForkJoinTask<Long> task = new SumTask (array, 0 , array.length); Long result = ForkJoinPool.commonPool().invoke(task);
线程工具 ThreadLocal Thread.currentThread() 获取当前线程。
如何在一个线程中传递状态?
JDK 提供 ThreadLocal,在一个线程中传递同一个对象:
1 2 3 4 5 6 static ThreadLocal<String> threadLocalUser = new ThreadLocal <>();threadLocalUser.set("Bob" ); String current = threadLocalUser.get();threadLocalUser.remove();
1 2 3 4 5 6 7 8 9 10 11 12 13 14 15 16 17 18 19 20 21 22 23 24 25 26 27 28 29 30 31 32 33 34 35 36 37 38 39 40 41 42 43 44 45 46 47 48 49 50 51 52 53 54 55 56 57 58 59 60 61 62 63 64 65 66 67 68 69 class User { String name; int level; public User (String name, int level) { this .name = name; this .level = level; } } class UserContext implements AutoCloseable { static final ThreadLocal<User> context = new ThreadLocal <>(); public static User getCurrentUser () { return context.get(); } public UserContext (User user) { context.set(user); } public void close () { context.remove(); } } class ProcessThread extends Thread { User user; ProcessThread(User user) { this .user = user; } public void run () { try (UserContext ctx = new UserContext (user)) { new Greeting ().hello(); Level.checkLevel(); } } } class Greeting { void hello () { User user = UserContext.getCurrentUser(); } } class Level { static void checkLevel () { User user = UserContext.getCurrentUser(); if (user.level > 100 ) { } else { } } } Thread t1 = new ProcessThread ("Chuck" , 500 );Thread t2 = new ProcessThread ("Nano" , 1200 );t1.start(); t2.start(); t1.join(); t2.join();
可以把 ThreadLocal 看成全局 Map<Thread, Object>,每个线程获取 ThreadLocal 变量时,使用 Thread 本身作为 key。
1 Object threadLocalValue = threadLocalMap.get(Thread.currentThread());
ThreadLocal 适合在一个线程的处理流程中保持上下文(避免了同一参数在所有方法中传递)。使用 ThreadLocal 要用 try ... finally,或者try() { ... }。而且,使用try ... finally一定要再 finally 中清除:
1 2 3 4 5 6 try { UserContext.set(user); } finally { UserContext.remove(); }
Maven 基础 介绍作为使用最广泛的 Java 项目管理工具的 Maven 的基本用法,理解并使用 Maven 的依赖管理、构建流程、插件及模块化管理。
入门 简介 一个 Java 项目:
Maven 是一个 Java 项目管理和构建工具:
标准化项目结构
标准化构建流程(编译、打包、发布…)
依赖管理
项目结构(千万不要随意修改结构):
1 2 3 4 5 6 7 8 9 10 a-maven-project +- src | +- main | +- java Java 源码 | +- resources 资源文件 | +- test | +- java Java 测试源码 | +- resources 测试资源文件 +- target 编译输出 +- pom.xml 项目描述文件
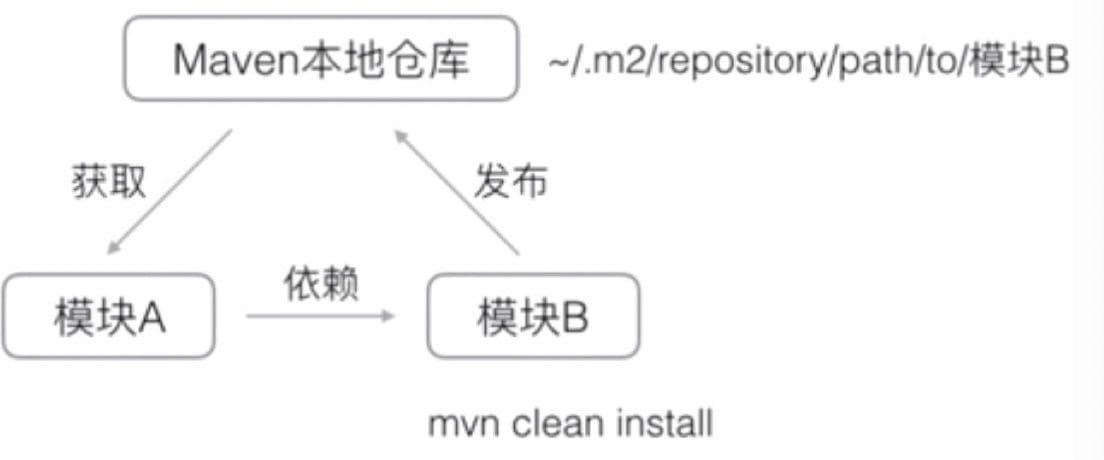
在 Maven 中声明一个依赖项可以自动下载并导入 classpath;Maven 使用 groupId、artifactId 和 version 唯一定位一个 jar 包。
普通的 Java 项目 pom.xml 结构:
Group Id:域名,如 com.mycompany。
修改项目 JDK、编译器等版本:
1 2 3 <java.version > 1.8</java.version > <maven.compiler.source > 1.8</maven.compiler.source > <maven.compiler.target > 1.8</maven.compiler.target >
依赖管理 传统方法:搜索引擎 - 手动下载 - 解压 - 放入 classpath
Maven 解决了依赖管理问题(Sample 项目 -> abc -> xyz):
Maven 会自动导入 abc,又会自动导入 xyz。
Maven 的依赖关系类型:
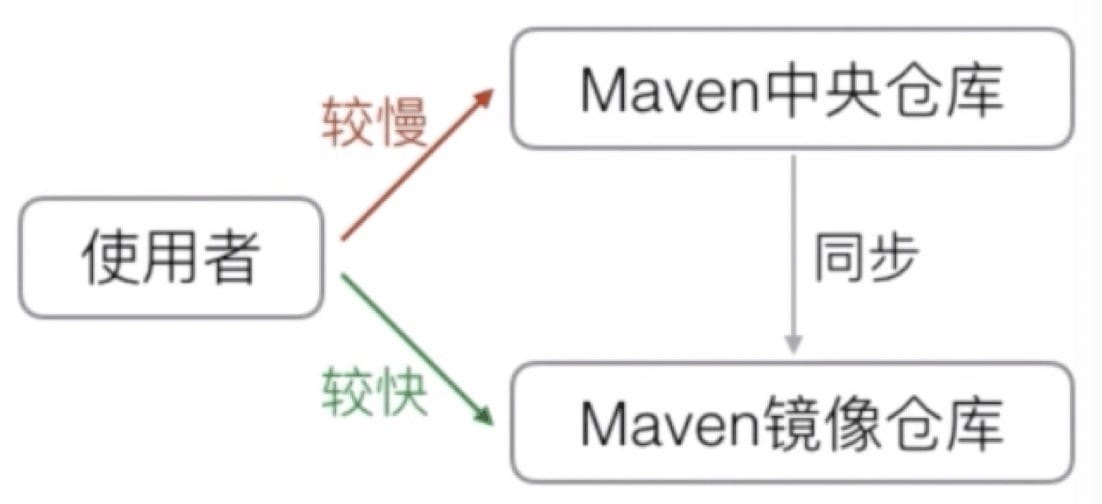
Maven 从何下载所需的依赖?
Maven 维护了一个中央仓库(repo1.maven.org)
第三方库将自身上传至中央仓库
Maven 从中央仓库把所需依赖下载到本地
Maven 会自动缓存已下载的 jar 包(~/.m2/repository)
1 2 3 4 5 6 7 8 <dependencies > <dependency > <groupId > junit</groupId > <artifactId > junit</artifactId > <version > 4.12</version > <scope > test</scope > </dependency > <dependencies >
Maven 镜像仓库:
在~/.m2/settings.xml配置 Maven 镜像仓库:
1 2 3 4 5 6 7 8 9 10 <setting > <mirrors > <mirror > <id > aliyun</id > <name > aliyun</name > <mirrorOf > central</mirrorOf > <url > http://maven.aliyun.com/nexus/content/groups/public/</usl > </mirror > </mirros > </setting >
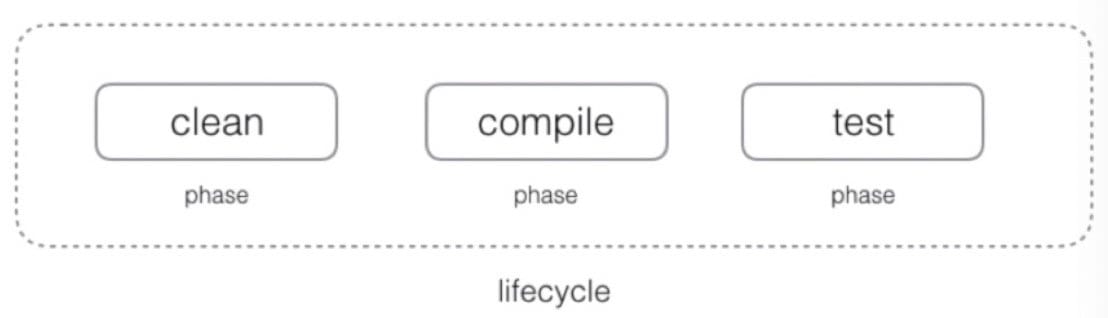
构建流程
clean(删除所有编译生成的文件)
compile(编译源码、编译测试源码)
test(运行测试)
package(打包为 jar / war)
Maven 的生命周期(lifecycle)由一系列阶段(phase)构成:
1 2 mvn compile mvn clean test # 将执行 clean、compile、test,因为 test 依赖 compile
执行一个 Phase 实际上是执行了一系列 Goal 直到该 Phase 为止。
如执行:mvn compile:
1 validate -> initialize -> generate-sources -> process-sources -> generate-resources -> process-resources -> compile
执行一个 Phase 又会触发一个或多个 Goal,Goal 是最小执行任务单元:
compile -> compiler:compile
test -> compiler:testCompile、surefile:test
命令行中使用:
1 2 3 4 5 6 # 已在 pom.xml 所在目录 mvn clean compile mvn test mvn compiler:copmile mvn clean package # 最常用:编译、测试、打包 jar 包 # 但它不会打包依赖的 jar 包
进阶 使用插件 Maven 通过调用不同的插件(Plugin)来构建项目,如 mvn compile 实际上是执行 compiler 插件。
clean 插件(clean)
compiler 插件(compile)
surefire 插件(test)
jar 插件(package)
自定义插件要声明(如 maven-shade-plugin)。
常用插件:
maven-shade-plugin:打包所有依赖包并生成可执行 jar
cobertura-maven-plugin:生成单元测试覆盖率报告
findbugs-maven-plugin:对 Java 源码进行静态分析以找出潜在问题
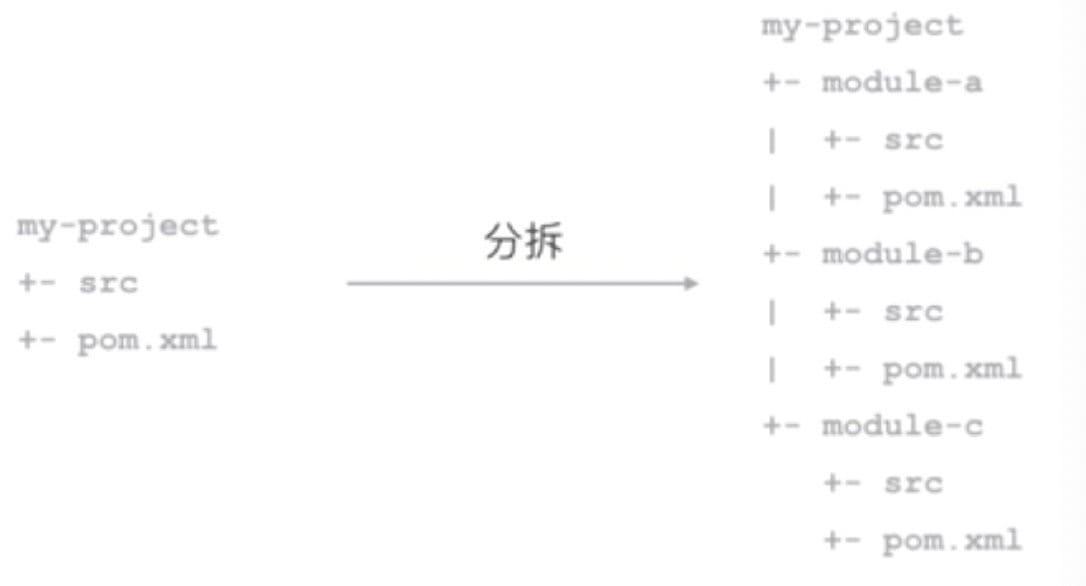
模块管理 把大项目拆分为模块是降低软件复杂度的有效方法。
如果模块 A 和模块 B 的 pom.xml 高度相似,可以提取出共同部分作为 parent。
Maven 有中央仓库、私有仓库、本地仓库。
但不推荐。
可以通过<moduels>编译多个模块。
在 IntelliJ IDEA 中 Project 是最顶级的级别,次级别是 Module。一个 Project 可以有多个 Module。目前主流的大型项目结构都是类似这种多 Module 结构,比如我们的项目可以划分为 helloworld-app、helloworld-utils、helloworld-model 等等,Module 之间可以互相依赖。而 Project 是一个抽象的概念,Project 由一个或者多个Module 组成。Project 跟 Module 之间的关系由 pom.xml 来配置,Module 之间的依赖由 Module 文件夹中的 pom.xml 来配置。
大多数情况下,一个项目都只有一个 Module 构成,需要进行分层都会通过 package 来完成。
1 project -> module -> package -> class -> method
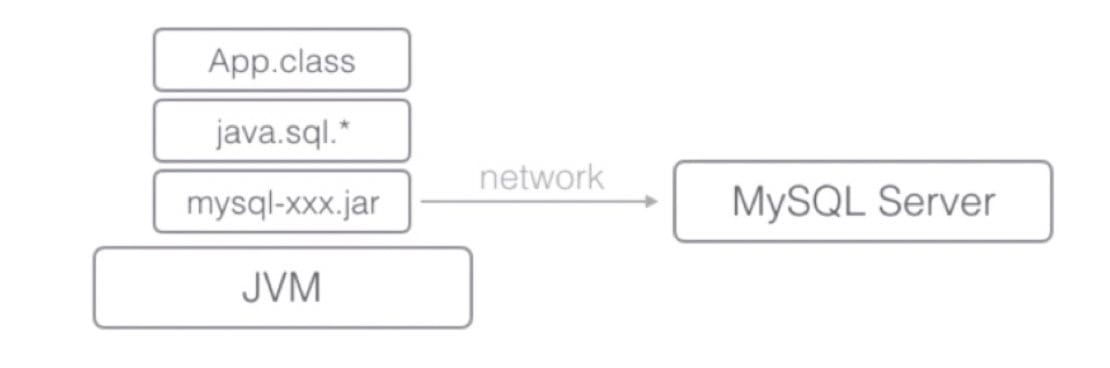
JDBC 基础 简介 JDBC:Java DataBase Connectivity
使用方法:
1 2 3 4 5 String JDBC_URL = "jbc:mysql://localhost:3306/test" ;String JDBC_USER = "root" ;String JDBC_PASSWORD = "password" ;Connection conn = DriverManager.getConnection(JDBC_URL, JDBC_USER, JDBC_PASSWORD);conn.close();
使用 JDBC 的好处:
各数据库厂商使用相同的接口,Java 代码不需要针对不同数据库开发。
Java 程序编译器仅依赖 java.sql.*,不依赖具体数据库的 jar 包。
可随时替换底层数据库,访问数据库的 Java 代码不变。
查询 1 2 3 4 5 6 7 8 9 10 11 12 try (Connection conn = DriverManager.getConnection(JDBC_URL, JDBC_USER, JDBC_PASSWORD)) { try (Statement stmt = conn.createStatement()) { try (ResultSet rs = stmt.executeQuery("SELECT * FROM students WHERE gender=\'M\'" )) { while (rs.next) { long id = rs.getLong(1 ); long classId = rs.getLong(2 ); String name = rs.getString(3 ); String gender = rs.getString(4 ); } } } }
为了避免 SQL 注入的问题,我们最好使用 PreparedStatement。
1 2 3 4 5 6 7 User login (String name, String pass) { PreparedStatement ps = conn.prepareStatement("SELECT * FROM user WHERE login=? AND pass=?" ); ps.setObject(1 , name); ps.setObject(2 , pass); }
更新 & 插入 1 2 3 4 5 6 7 8 9 10 11 12 13 14 15 16 17 18 19 20 21 22 23 try (Connection conn = DriverManager.getConnection(...)) { try (PreparedStatement ps = conn.prepareStatement("UPDATE students SET name=? WHERE id=?" )) { ps.setObject(1 , "Bob" ); ps.setObject(2 , 999 ); int n = ps.executeUpdate(); } } try (Connection conn = DriverManager.getConnection(...)) { try (PreparedStatement ps = conn.prepareStatement("INSERT INTO students (class_id, name, gender) VALUES (?,?,?)" , Statement.RETURN_GENERATED_KEYS)) { ps.setObject(1 , 1 ); ps.setObject(2 , "Bob" ); ps.setObject(3 , "M" ); int n = ps.executeUpdate(); try (Result rs = ps.getGenerateKeys()) { if (rs.next()) { long id = rs.getLong(1 ); } } } }
事务 数据库事务(Transaction)具有 ACID 特性:
Atomicity 原子性
Consistency 一致性
Isolation 隔离性
Durability 持久性
问题:
脏读:Dirty Read
非重复读:Non-repeatable Read
幻读:Phantom Read
事务隔离级别:
1 2 3 4 5 6 7 8 9 10 11 12 13 14 conn = openConnection(); try { conn.setAutoCommit(false ); insert(); update(); delete(); conn.commit(); } catch (Exception e) { conn.rollback(); } finally { conn.setAutoCommit(true ); conn.close(); }
函数式编程 介绍 Java 函数式编程(Functional Programming)的基本概念,如何使用 lambda 表达式和 stream 数据流。
Lambda 基础 函数式编程:
把函数作为基本运算单位
函数可以作为变量
函数可以接收函数
函数可以返回函数
历史上研究函数式编程的被称为λ 演算(Lambda)。
Java 中,Lambda 表达式的引用是为了简化语法,类型自动推断。(JDK >= 1.8)
传统的匿名类方式:
1 2 3 4 5 Arrays.sort(array, new Comparator <String>() { public int compare (String s1, String s2) { return s1.compareTo(s2); } });
Lambda 方式:
1 2 3 Arrays.sort(array, (s1, s2) -> { return s1.compareTo(s2); });
Java 的单方法接口(函数式接口):Comparator、Runnable、Callable。
单方法接口可以被标注为 @FuntionalInterface,即函数式接口。
1 2 3 4 5 6 7 8 9 10 11 12 13 14 15 16 17 @FunctionalInterface public interface Callable <V> { V call () throws Exception; } @FunctionalInterface public interface Comparator <T> { int compare (T o1, T o2) ; boolean equals (Object obj) ; default Comparator<T> reversed () { return Collections.reverseOrder(this ); } public static <T extends Comparable <? super T>> Comparator<T> reverseOrder () { return Collections.reverseOrder(); } }
方法引用(Method Reference) 方法引用:如果某个方法签名和接口恰好一致,可以直接传入方法引用,如 String::compareTo。
1 2 3 4 5 Arrays.sort(array, (s1, s2) -> { return s1.compareTo(s2); }); Arrays.sort(array, String::compareTo);
注意,这里的方法签名只看返回值和参数类型。
静态方法引用:同实例方法引用。
注意实例方法的以下情况:
实例方法的第一个参数其实是 this。
1 2 3 4 5 6 7 8 9 10 11 public class String { public int compareToIgnoreCase (String s) { } } Arrays.sort(array, String::compareToIgnoreCase);
构造方法引用:
map() 传入的方法签名是:Person method(String)
1 2 3 4 5 6 7 8 9 10 11 class Person { String name; public Person (String name) { this .name = name; } } List<String> names = Arrays.asList("Bob" , "Alice" , "Tim" ); List<Person> persons = names.stream() .map(Person::new ) .collect(Collectors.toList());
编译器会自动查找符合条件的构造方法。注意,虽然 Java 构造方法不能有 return
Functional Interface 可以传入:
接口的实现类(代码比较繁琐)
Lambda 表达式
符合方法签名的静态方法
符合方法签名的实例方法(实例类型被看做第一个参数类型)
符合方法签名的构造方法(实例类型被看做返回类型)
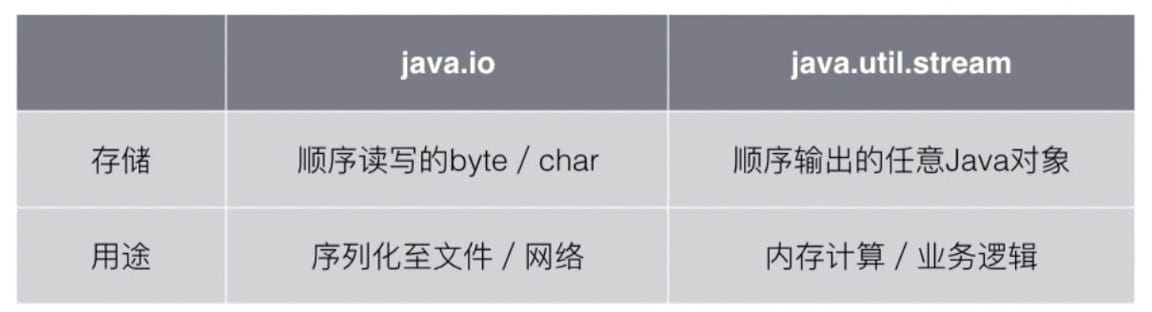
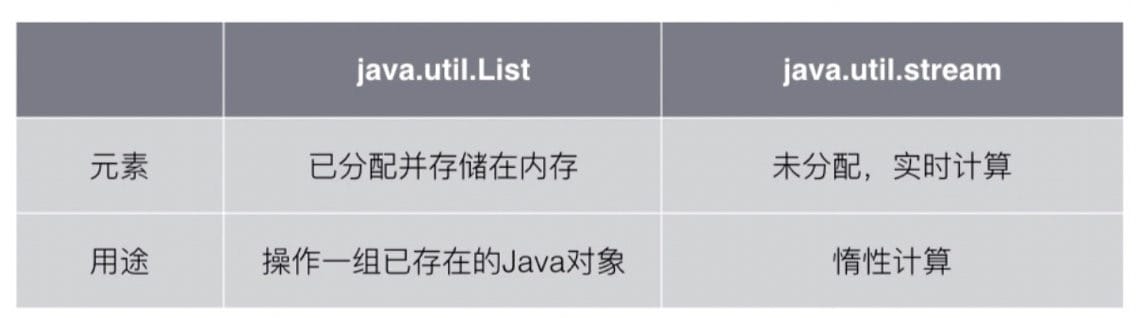
Stream 简介 Java 8 引入了全新的 Stream API:java.util.stream。
其不同于 java.io 的 InputStream / OutputStream:
Stream 的特点:
可以“存储”有限个或无限个元素
可以转换为另一个 Stream
计算通常发生在最后结果的获取(惰性计算)
创建 Stream 1 2 3 Stream<Integer> s = Stream.of(1 , 2 , 3 , 4 , 5 ); Stream<Integer> s = Arrays.stream(theArray); Stream<Integer> s = aList.stream();
1 2 3 4 5 6 7 8 9 10 11 12 class NaturalSupplier implements Supplier <BigInteger> { BigInteger next = BigInteger.ZERO; public BigInteger get () { next = next.add(BigInteger.ONE); return next; } } Stream<BigInteger> s = Stream.generate(new NaturalSupplier ());
但是,如上 Stream 存在问题:
1 2 3 4 s.forEach(System.out::println); s.limit(100 ).forEach(System.out::println);
1 2 3 4 5 6 String[] array = "JDK Stream API supports funtional-style operations" .split(" " ); long n = Arrays.stream(array) .filter((s) -> s.eqauls(s.toUpperCase())) .count(); System.out.println("How many words? " + n);
还有很多方法返回 Stream:
1 2 3 4 5 6 7 8 9 10 11 12 13 try (Stream<String> lines = Files.lines(Paths.get("/path/to/access.og" ))) { } String input = "a, b, c, dd, E, ff" ;Pattern pattern = Pattern.compile("\\s*\\,\\s*" );Stream<String> s = pattern.splitAsStream(input); Stream<int > s; IntStream is = IntStream.generate(IntSupplier s);LongStream ls = LongStream.generate(LongSupplier s);DoubleStream ds = DoubleStream.generate(DoubleSupplier s);
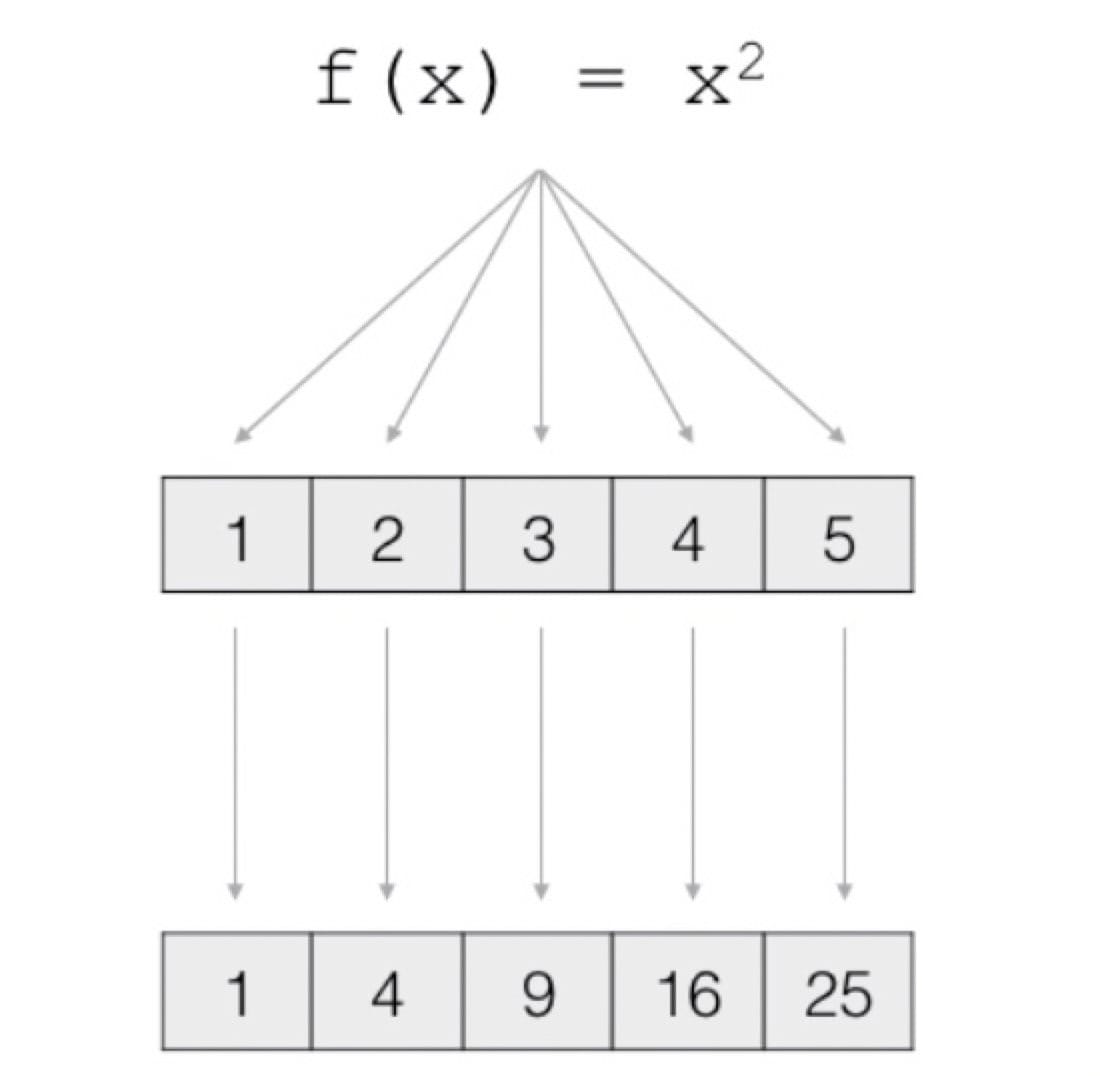
map Stream.map() 是一个 Stream 的转换方法,把一个 Stream 转换为另一个 Stream。
Stream.map()
1 2 3 4 5 6 7 8 9 10 11 12 <R> Stream<R> map (Function_Foo<? super T, ? extends R> mapper) ; @FunctionalInterface public interface Function_Foo <T, R> { R apply (T t) ; }
1 2 3 4 5 6 Stream<Integer> s1 = Stream.of(1 , 2 , 3 , 4 , 5 ); Stream<Integer> s2 = s1.map((n) -> n * n); String[] array = "Stream API supports functional-style operation" .split(); Stream<String> sm = Arrays.stream(array); sm.map(String::toUpperCase).forEach(System.out::println);
1 2 3 4 5 6 7 8 9 String[] inputs = { "Bob,M" , "Alice,F" , "Time,M" }; Stream<String> names = Arrays.stream(inputs); Stream<Person> persons = names.map((s) -> { int n = s.indexOf(',' ); String name = s.substring(0 , n); char gender = s.charAt(n + 1 ); return new Person (name, gender); }); persons.forEach(System.out::println);
filter 对所有元素进行测试,不满足的元素就被过滤掉了。
1 2 3 4 5 6 Stream<T> filter (Predicate<? super T> predicate) ; @FunctionalInterface public interface Predicate <T> { boolean test (T t) ; }
reduce reduce 是聚合方法,如 count() 返回元素个数。
1 2 3 4 5 6 7 Optional<T> reduce (BinaryOperator<T> accumulator) ; @FunctionalInterface public interface BinaryOperator <T> extends BiFunction <T, T, T> { T apply (T t, T u) ; }
例子:
1 2 3 Stream.of(1 , 2 , 6 , 8 , 9 ).reduce((acc, n) -> acc + n); Stream.of(1 , 2 , 6 , 8 , 9 ).reduce(1000 , (acc, n) -> acc + n);
其他操作 排序:
1 2 Stream<T> sorted () Stream<T> sorted (Comparator<? super T> cp)
去除重复元素:
截取:
1 2 Stream<T> limit (long ) Stream<T> skip (long )
合并 Stream:
1 2 3 4 Stream<Integer> s = Stream.concat( Stream.of(1 , 2 , 3 ), Stream.of(4 , 5 , 6 ) );